![[ProjectSTi]](https://blogger.googleusercontent.com/img/a/AVvXsEgqVanZg9w-c4hS30-vwmY1vqbhTqkAlpb0a2RMSq9lGDlNvjWa6PF_M3Dcb_y6Lzef4wChPlx3cJivdW2n8v3tjZ8PrUJzH4D7Ktx4Jhzz0H0hrUmEXP80ofkZt9y5xM1irMQWm787FTXxzia9UsFrNI3MwfiwgLlTpAO-55uip-USRGdOW4WYicZieO0=s174)
Today actually progressed better than expected. I had started by washing all parts, bearings and anything that was going into the block. Once drying with compressed air again, I was ready to apply assembly lube to all the rotating and load bearing surfaces. I know I cleaned the bits yesterday, but for an engine, it HAS to be spotless.


Bearings went into place in the block and you have to pay close attention to make sure the "nips and tangs" match up. The bearings have a small extra location piece on one side and this is the bit that slots into the matching groove in the engine block, or the con rod.


The con rods were another matter entirely. You have to stretch the bolts, so when you unpack the rods from the box, again.....clean them! Then slacken off the bolts, and then gently tap the bearing shell with wood or a mallet to allow the bearing saddle to loosen off. Its best to leave the bolts in place until the bearing cap is loose as you need to put it back in place the exact same ay it was removed.
All manufacturers instructions differ, but my instructions with the Manley rods said to use 30Wt engine oil on the threads and NOT moly or ARP lube. I then used the oil, and torqued up the bolts. You need to measure bolt stretch, and make sure that at a certain torque, the bolts increase in length. With the ARP 3/8 bolts it was 88NM torque.
I then slackened the bolts off....and more cleaning!

Once all parts were cleaned and blown with dry air, I started to fit the bearings to the block and con rods. Then apply assembly lube, and torque up the con rods onto the crank shaft. The crank was lowered into position and the 2nd case half lowered on top of the first case half.

There is a specific order you need to tighten the case bolts on the scooby block and and again, this is in the manual. Basically you alter between the right hand case half and the left hand case half and torque them up in stages. Its handy to have the engine on a bench so you can rotate it on a sheet of cardboard. It really saves you back from having to lift and rotate the block!!
Once all the water casing and block bolts are tight (a measly 40NM or torque + 90 degrees) you can say a prayer and give the crank a spin by hand. It SHOULD feel free and rotate easily.
Its also important to check the clearance between the con rod and crank web. If you have some plastigauge, use this to check your main and big end bearing clearance.


Tomorrow I plan to finish off the final two sets of rings, then final cleaning, before building the block and sealing the case halves with liquid gasket. I didn't put the O Rings in place this time, as it was only a practice assembly.
Once Im back to the completed stage, it will be time to put the rings on the pistons, then install them in the block. After that, install the gudgeon pin covers and thats the completion of the short block!!
Bearings went into place in the block and you have to pay close attention to make sure the "nips and tangs" match up. The bearings have a small extra location piece on one side and this is the bit that slots into the matching groove in the engine block, or the con rod.
The con rods were another matter entirely. You have to stretch the bolts, so when you unpack the rods from the box, again.....clean them! Then slacken off the bolts, and then gently tap the bearing shell with wood or a mallet to allow the bearing saddle to loosen off. Its best to leave the bolts in place until the bearing cap is loose as you need to put it back in place the exact same ay it was removed.
All manufacturers instructions differ, but my instructions with the Manley rods said to use 30Wt engine oil on the threads and NOT moly or ARP lube. I then used the oil, and torqued up the bolts. You need to measure bolt stretch, and make sure that at a certain torque, the bolts increase in length. With the ARP 3/8 bolts it was 88NM torque.
I then slackened the bolts off....and more cleaning!
Once all parts were cleaned and blown with dry air, I started to fit the bearings to the block and con rods. Then apply assembly lube, and torque up the con rods onto the crank shaft. The crank was lowered into position and the 2nd case half lowered on top of the first case half.
There is a specific order you need to tighten the case bolts on the scooby block and and again, this is in the manual. Basically you alter between the right hand case half and the left hand case half and torque them up in stages. Its handy to have the engine on a bench so you can rotate it on a sheet of cardboard. It really saves you back from having to lift and rotate the block!!
Once all the water casing and block bolts are tight (a measly 40NM or torque + 90 degrees) you can say a prayer and give the crank a spin by hand. It SHOULD feel free and rotate easily.
Its also important to check the clearance between the con rod and crank web. If you have some plastigauge, use this to check your main and big end bearing clearance.
Once your happy that the crank rotates and all its all good...you need to slacken off the case bolts and take the whole thing apart AGAIN. The next step....clean everything! Slacken the bolts in reverse order.
Your now ready to move on to the piston ring gap clearances.
Its easy but slow.....
Put the ring into the cylinder which will eventually be its home, then use the piston to push it into the bore. The instructions state a depth of about 22mm, from the top of the deck. I found it easier just to measure this, then use the piston upside down in the bore to push the ring down to the required depth.
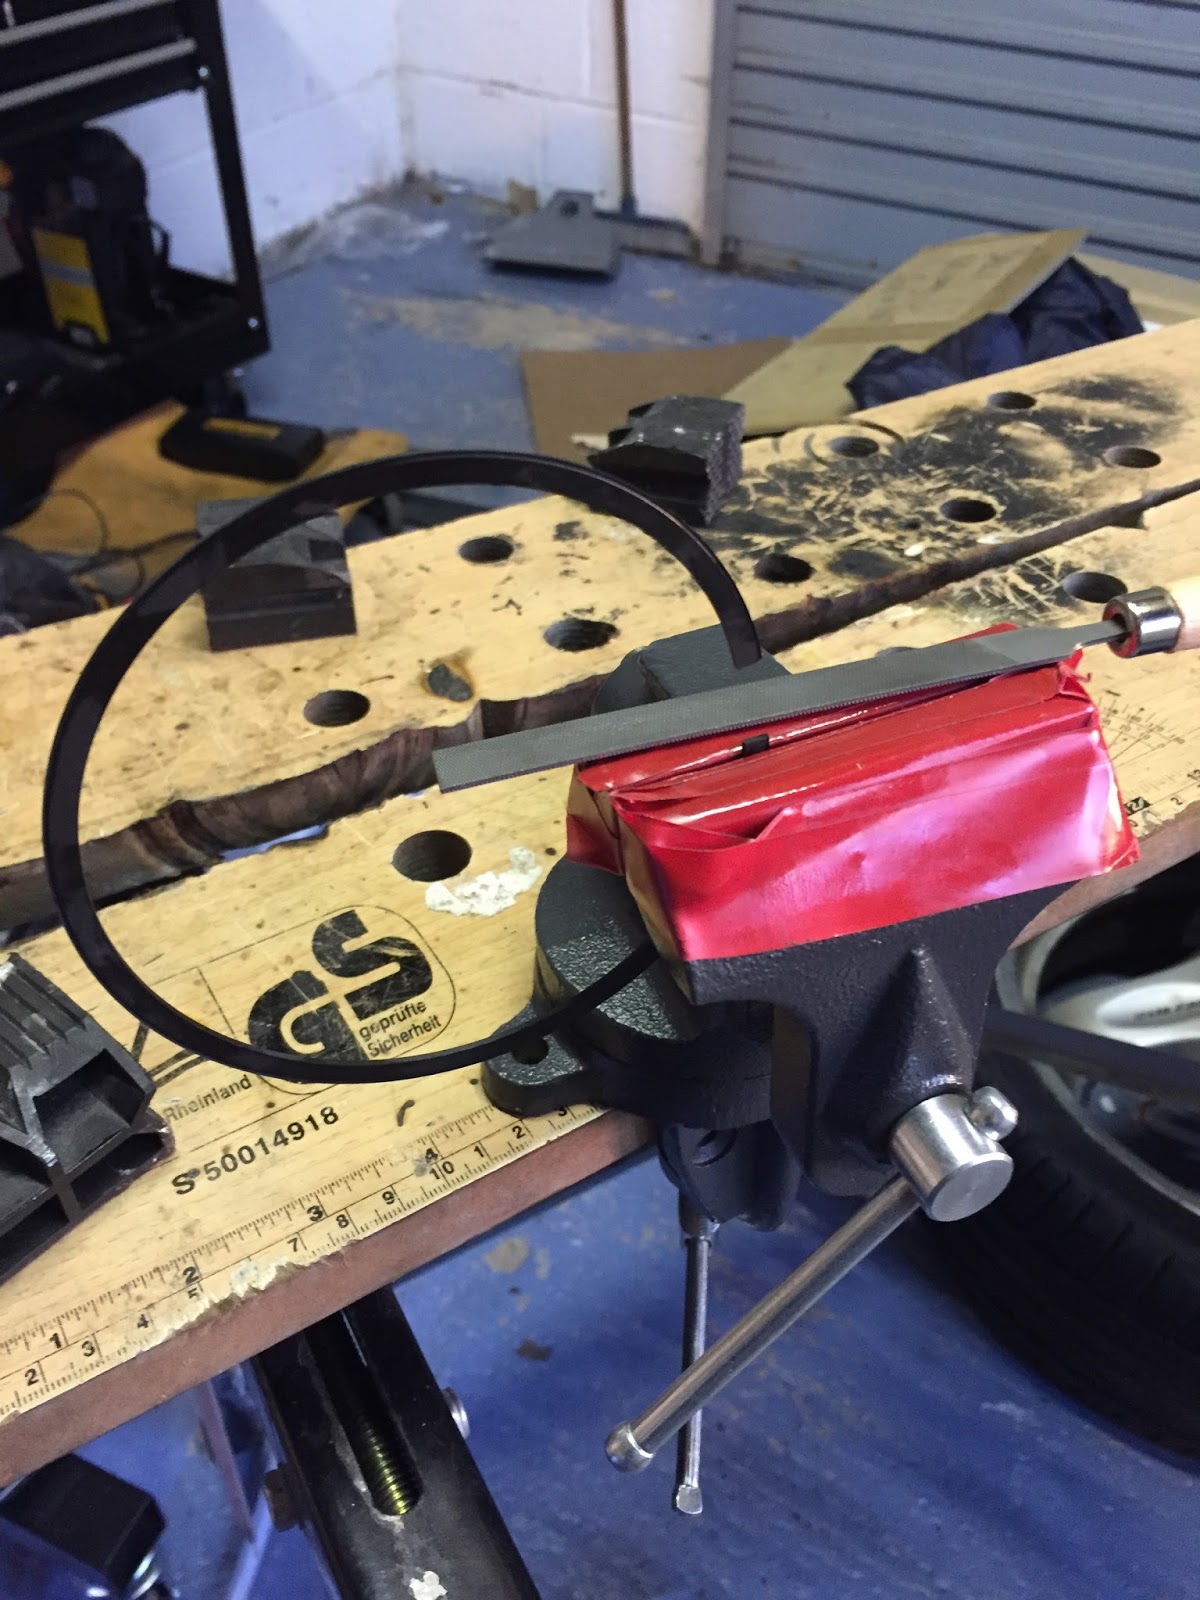
Check the gap with feeler gauges, then remove and put the ring in a vice.
Once in the vice, gently use the file to file in one direction only, from the outside to the inside of the ring. I found that every 3 - 4 moves of the file, I checked the clearance of the ring in the liner again. It took about 15mins working steadily, but carefully to increase the gap on each ring from a starting gap of 0.3mm to 0.6mm as recommended by the instructions. The more boost you want to run, the bigger the gap. This is the point in the build where you NEED to know what power you want to achieve!!
I went for the medium boost of 14-25psi so that meant a ring gap of 0.6mm.
Tomorrow I plan to finish off the final two sets of rings, then final cleaning, before building the block and sealing the case halves with liquid gasket. I didn't put the O Rings in place this time, as it was only a practice assembly.
Once Im back to the completed stage, it will be time to put the rings on the pistons, then install them in the block. After that, install the gudgeon pin covers and thats the completion of the short block!!
Comments
Post a Comment